 Save
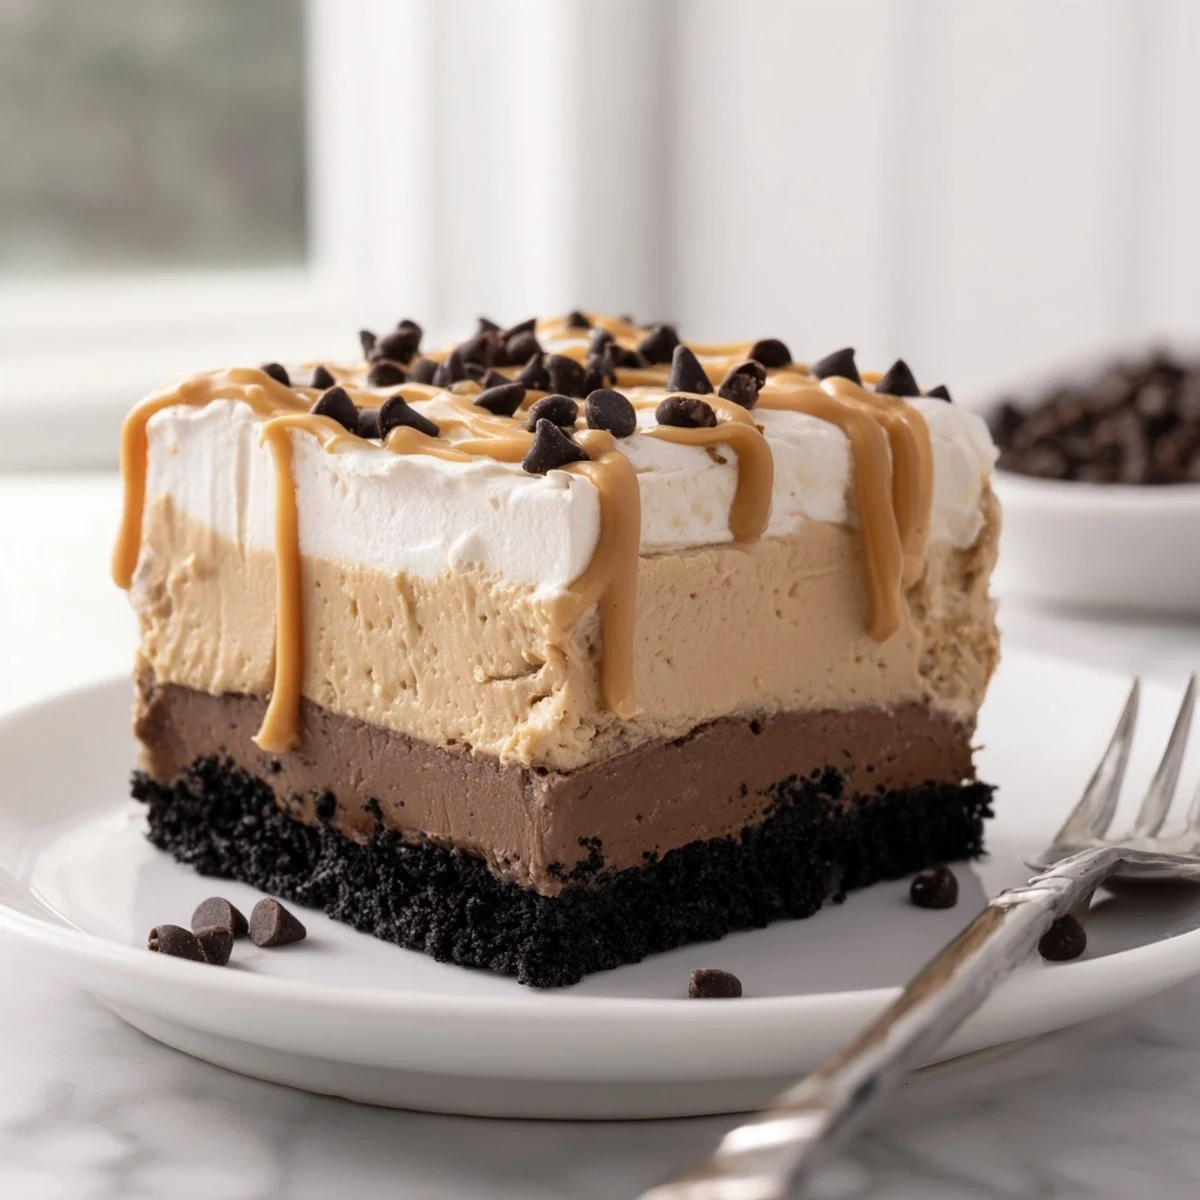
Save This no-bake peanut butter layered delight brings together a crunchy chocolate cookie crust, a velvety cream cheese and peanut butter mousse, rich chocolate pudding, and a cloud of whipped topping. It's an easy, crowd-pleasing dessert that requires just 25 minutes of prep before chilling.
Each square delivers a satisfying contrast of textures—from the crisp base to the silky layers above. Ideal for potlucks, holidays, or any occasion that calls for an indulgent American-style sweet treat.
My sister brought this dessert to a July cookout one year and refused to tell anyone what was in it until every last square vanished from the pan. Three people guessed it was from a bakery, and I spent the entire drive home thinking about those layers of peanut butter and chocolate locked inside that dark cookie crust. The following weekend I called her from the grocery store aisle, reading off ingredients while she laughed at my urgency. Its the kind of recipe that makes you look like you tried far harder than you actually did.
I made this for a friend who once claimed she did not like peanut butter desserts, and she took home the remaining leftovers in a container she clearly intended to keep. There is something about the way the cream cheese smooths out the peanut butter that changes even stubborn minds.
Ingredients
- Chocolate sandwich cookies (200 g): Regular Oreos work beautifully, but any chocolate sandwich cookie will crush into a crust that sets the whole foundation.
- Unsalted butter (75 g), melted: Acts as the glue for your crust, and using unsalted lets you control the richness without any unexpected saltiness.
- Cream cheese (225 g), softened: Leave it on the counter for at least an hour because cold cream cheese will leave you with lumpy bits no amount of beating can fix.
- Creamy peanut butter (120 g): Skip the natural kind that separates for this recipe since the stabilized spread blends into a silkier layer.
- Powdered sugar (100 g): Sweetens the peanut butter layer without any grainy texture that granulated sugar would leave behind.
- Whipped topping (480 ml total, divided): Thawed Cool Whip folds in easily and keeps everything light, though homemade whipped cream works if you prefer real cream.
- Instant chocolate pudding mix (1 package, 100 g): The instant kind is essential here since it sets without cooking and thickens within minutes of whisking.
- Cold milk (375 ml): Whole milk gives the richest pudding, but any milk you have on hand will do the job.
- Melted peanut butter and chocolate shavings (optional): These finishing touches turn a casual pan dessert into something that looks genuinely impressive.
Instructions
- Build the crust:
- Toss the crushed cookies and melted butter together in a bowl until every crumb looks evenly coated and slightly damp. Press the mixture firmly into the bottom of your baking dish using the back of a spoon or your fingers, packing it tight so it holds together later.
- Whip up the peanut butter layer:
- Beat the softened cream cheese, peanut butter, and powdered sugar until the mixture is completely smooth with no pale streaks visible. Gently fold in 240 ml of the whipped topping with a spatula, keeping the movement light so you do not deflate it, then spread this cloud evenly over your chilled crust.
- Make the chocolate pudding:
- Whisk the pudding mix and cold milk together for about two minutes until you feel it thicken under your whisk. Pour and spread it gently over the peanut butter layer, using the back of your spoon to ease it to the edges without disturbing what is underneath.
- Finish the top:
- Spread the remaining 240 ml of whipped topping over the pudding in smooth swoops. Drizzle with melted peanut butter and scatter chocolate shavings if you want that extra touch of indulgence.
- Chill patiently:
- Cover the dish and refrigerate for at least three hours so the layers can set and the flavors meld into something far better than when they went in.
- Slice and serve:
- Use a sharp knife to cut into squares, wiping the blade clean between cuts for neat layers that show off every stripe when you serve them.
 Save
Save On a rainy Sunday afternoon, my neighbor stopped by to return a borrowed pan and ended up sitting at my kitchen counter eating two squares while telling me about her childhood dog. The dessert was barely out of the fridge ten minutes and half of it was already gone.
Serving Ideas That Work
This dessert pairs well with strong coffee or a glass of cold milk, and I have served it alongside fresh strawberries when I wanted to pretend the table was balanced. A light dusting of sea salt on top right before serving brings out the peanut butter in a way that surprises people every time.
Making It Your Own
Swap the chocolate cookies for graham crackers if you want a lighter crust, or scatter chopped roasted peanuts between the layers for a crunch that wakes up each bite. A friend of mine adds a thin layer of caramel sauce over the pudding and swears it is the only improvement worth making.
Storage and Planning
This actually tastes better on the second day when the layers have had time to settle into each other, so it is an ideal make ahead dessert for when you have guests coming and want to focus on everything else. It keeps well covered in the fridge for up to four days.
- Cover tightly with plastic wrap or foil so the whipped top does not absorb fridge odors.
- Freeze individual squares on a sheet pan then transfer to a container for portioned treats that thaw in about twenty minutes.
- Always check ingredient labels on cookies and pudding mix if serving anyone with allergies since brands vary in cross contamination risks.
 Save
Save Some recipes earn a permanent spot in your rotation not because they are fancy but because they reliably disappear wherever you bring them. This is one of those, and the empty pan you carry home will say everything that needs saying.
Recipe FAQs
- → Can I make this dessert ahead of time?
-
Yes, this peanut butter layered delight actually benefits from being made in advance. You can prepare it up to 24 hours before serving. Keep it covered and refrigerated until ready to slice and serve.
- → Can I substitute natural peanut butter?
-
Commercial creamy peanut butter works best for a smooth, stable layer. Natural peanut butters tend to separate and can make the filling oily. If using natural peanut butter, ensure it's well-stirred and at room temperature.
- → How should I store leftovers?
-
Cover the baking dish tightly with plastic wrap or transfer individual squares to an airtight container. Store in the refrigerator for up to 4 days. The layers may soften slightly over time but will remain delicious.
- → Can I freeze this layered dessert?
-
Freezing is possible but not ideal, as the whipped topping and pudding layers can change texture upon thawing. If you do freeze it, wrap individual portions tightly and thaw overnight in the refrigerator before serving.
- → What can I use instead of whipped topping?
-
You can substitute an equal amount of homemade whipped cream. Whip 240 ml of heavy cream with 2 tablespoons of powdered sugar until stiff peaks form. Keep in mind that homemade whipped cream is less stable than commercial whipped topping.
- → How do I get clean slices when cutting?
-
Use a sharp knife dipped in hot water and wiped dry between cuts. The warmth helps glide through the layers cleanly. Chilling the dessert for the full 3 hours also ensures the layers are firm enough for neat slicing.
